 |
BIO 432 Field Botany Phil Ganter 320 Harned Hall 963-5782 |
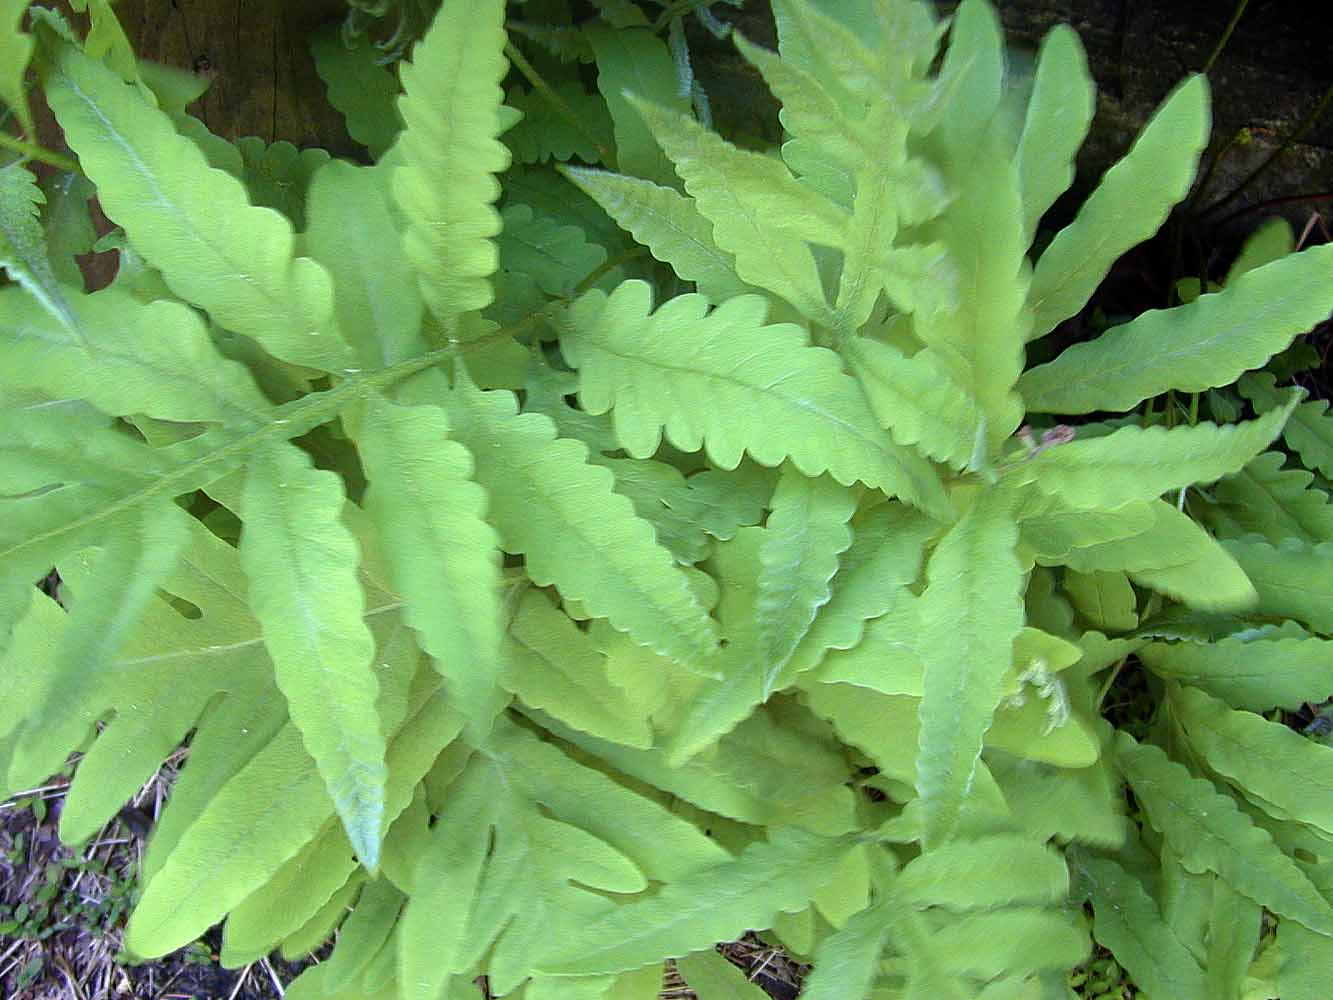
| Fern leaves - Which are leaves and which are leaflets? | |
|
BIO 432 Field Botany Phil Ganter 320 Harned Hall 963-5782 |
| Fern leaves - Which are leaves and which are leaflets? | |
Collecting Your Specimens
Back to:
| Academic Page | Tennessee State Home page |
| Bio 432 Page | Ganter home page |
Purpose of the page:
Before you can begin the process of identification, you will need to collect the plants and preserve them. This page is some advice about how to go about the collection step. Below are bookmarks to sections of this page.
General comments
First, and foremost, you are responsible for collecting. Do not collect from areas where collecting is specifically prohibited (state and national parks and forests are usually off-limits). Be courteous and ask landowners if you can collect specimens. In general, it is best to assume that it is illegal to collect without permission. Always remember to cause as little disturbance as you can.
The prohibition is not absolute but any collecting on state or federal lands requires a permit. The state regulations and permit can be viewed at:
The federal permits can be obtained from the park or forest office.
Second, you should be aware that some plants are rare or endangered and collecting should not be done when this is true. Don't mistake local abundance for species abundance. Rare or endangered plants (endangered is now an legally defined term due to the federal Endangered Species Act) do not always seem rare in the sense that you will find only lonely, isolated specimens. Some rare plants are found in a few large patches. It's the skimpy number of patches that makes the plant rare.
The best information on which plants are rare in Tennessee comes from a division of the Tennessee Department of Environment and Conservation (TDEC - Division of Natural Heritage). The site below is the home page of the division
The list of plants that are protected can be reached through the data links on the website (link is on the right side). There are additional resources besides the list (which is a pdf that you can download). One is an interactive list that you can rearrange and seach at:
It is helpful if you know if a plant is in the area you are collecting. The protected plants have been mapped. You can view the data by county or by quadrat (if you don't know what this is, stick to county level).
Before going collecting, be sure to take some aids. You will need a hand-trowel if you are collecting non-woody plants because you will take the entire plant and need to dig out the roots. If you are collecting woody plants, you are taking only clippings and will need plant shears or a plant clipper (same tool but different name). If you don't know which type you will collect, take both a trowel and a clipper. No matter what sort of plants you will collect, take some newspaper, some plastic bags (grocery store bags work well), a pencil, a notebook (to record the collection information) and your field guide. A backpack for transport is nice if you are expecting to walk out of sight of your car.
When you collect, you must collect information as well as a specimen. This is why the notebook and pencil are needed. Below is a list of the geographic and habitat characteristics you should note at the time of collection.
You can make your own collections sheets with spaces for the collection information or use a spiral notebook. Remember that you have to be able to connect the information to the specimen. This is what I do. I put only one specimen in a bag. I also put into the bag a corner torn from the sheet of paper with the collection record for that specimen. The corner has some sort of identifying information (a number or label) written on it. The label is also on the record sheet. Then, when I get back to the lab, I can take a use the corner of paper to put the record sheet with the right specimen. Don't rely on your memory to connect specimen and record! The information on the record sheet will be part of the specimen label. An example of a label can be viewed on the Mounting page.
You should also try to tentatively identify the plant before collecting it by using your field guide. This will make the identification step much easier. This won't work for all specimens but is very useful (one benefit is that you will be less likely to collect the same species twice). Be sure to read all of the laboratory webpages before beginning, but give a second read to the identification page before starting into the field.
Herbs and Grasses
When collecting herbs and grasses, look for a plant that has flowers on it. Fruits are also valuable. You will collect the entire plant, including some of the roots. You may have to bend the plant so that it will fit into the collecting bag. This is fine, as you would have to do this when you preserved or mounted the specimen in any case.
Loosen the soil at the plant's base with the trowel.
Remove the plant, fold it so that it will fit into the bag, and place it into the bag.
Take down the habitat information in your notebook.
Label the bag. The easiest way is to tear a small piece of paper off and label it with a number or some easy-to-remember name. Place the slip of paper in the bag and be sure to write the number or name in the notebook along with the habitat information.
One caution here. Grasses can be difficult to identify. Be sure you have a mature seed head or some flowers (they are often not very conspicuous) as without these, they can be impossible to identify. Flowering herbs (herb in the sense of a non-woody plant) can also be difficult without the flower.
Bushes and Trees
When collecting trees or shrubs, you can't take the entire plant. However, you will need pieces that will identify the plant. One problem will to be to know what a leaf is. This is not as easy as you might suspect. Many leaves have subdivisions, which can look like leaves themselves. This means you have to know some plant morphology. You can use the page with links to sites with plant morphology.
By the way, trees and bushes (= shrubs) are different from grasses and herbs (= forbes) in that they have woody stems. If there is one central woody stem, it is a tree. If there are several stems, it is a bush.
Leaves all arise from a stem on a stalk called a petiole. The petiole is filled with vascular tissue (xylem and phloem) plus some tissue to strengthen it. At the base of the petiole, where it hits the stem, the acute angle formed by the upper surface of the petiole and the stem is called the axilla (you axilla is your underarm). At the vertex of the angle, there is an axillary bud, which is always present. No bud, not a leaf. So if you are looking at a leaflet, not a leaf, you won't see the bud. All leaflets are part of leaves, so follow the leaf to its base and find the bud. When you collect a leaf, make sure it is the whole leaf attached to its stem.
Also collect enough material for two purposes. You will need material to preserve and material for identification. Ideally, you could use the same material for both, but time is short in a summer course and you should be identifying material as it dries.
Collect up to 5 to 25 leaves (some may get damaged, so overdo it rather than under do it), some still attached to their stem.
Collect specimens of any fruit or flowers present
Collect specimens of twigs. Remember that you have to have at least one twig with leaves attached for preservation. The arrangement of leaves on the twigs is usually important in identification.
Collect a specimen of bark large enough to get the impression of the look of the bark.
Bag all of these specimens (same bag) and label with a slip of paper as above in "Herbs and Grasses"
Take down habitat information in your notebook. Be sure to write the name or number on the label you put in the bag in the notebook too.
Go forward to the Preservation page
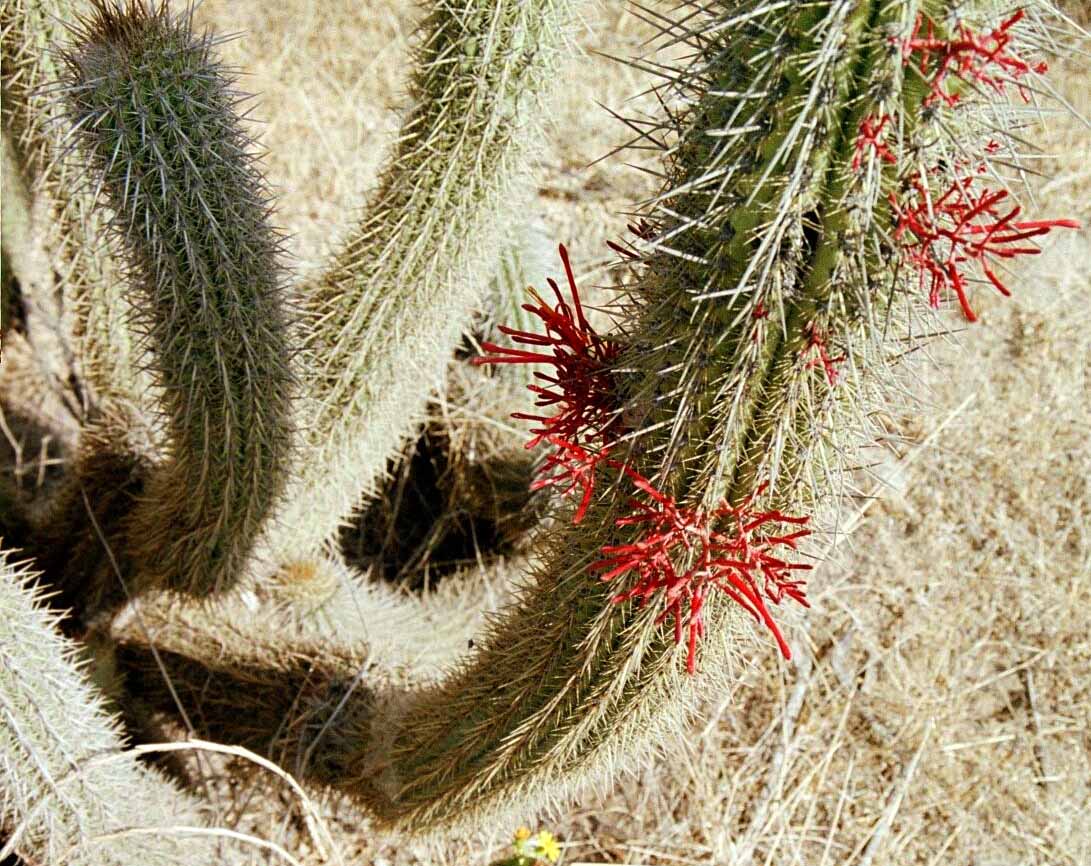
Here is an unusual plant. It's not the cactus (Echinopsis chilensis), it's the flowers. They aren't cactus flowers but the flowers of a plant that is a parasite inside the cactus. It is a mistletoe, Tristerix aphyllus, a relative of the mistletoes that can be seen in trees (often oaks) in Tennessee. It is easiest to see our local mistletoe in the fall, after the tree has lost its leaves. The Tennessee mistletoes have leaves throughout the year and produce white berries in the fall (these are the mistletoe over doorways at Christmas). The cactus parasite has no leaves or roots but exists as a group of cells inside the vascular bundle of the cactus. When its time to reproduce, it forms stems that grow out from the bundles and form flowers once they have erupted from the cactus' surface. Fruits are formed and eaten by birds, which carry the seeds to new hosts in their feces. There the seeds, which are covered by a mucilage, are deposited on the surface of the cacti. The mucilage glues them to the surface and, when they germinate, anchors the seeds so that they can push their way past the tough skin of the cactus. Once inside, they grow into the cactus until they reach the vascular bundle. There are relatively few parasitic plants but parasitism is a life history that has evolved independently many, many times. No large taxonomic group lacks parasitic members.
Go forward to the Preservation page
Last updated July 11, 2013